Sunday, July 1, 2012

Lemons Study

Here is a little painting I did as a class demo, a study of lemons. 
I am experimenting with a loose wash background that looks more like watercolor, to add a bit of interest and variety to the paint contrast. It is an oil. What do you think?

Wednesday, June 6, 2012

Peony


This vibrant peony is a watercolor painted on archival 140 bl. paper.
The size is 9x12 inches and you can bid on the painting by clicking the link above.
This painting is part of my  "10 Steps to Beautiful Flowers" series,
If you are interested in more information on my step by step  painting lessons, please drop me an email or sign up in the upper right, so you will be first in line when the tutorials are ready.

Monday, May 28, 2012

Light on the Lily

I love lilies in my garden. They smell so sweet, and look so elegant.
They are fun to paint, as the curling petals make for interesting shapes and shadows. The three dimension of the anthers and stamens are like little floating bits, perched on long delicate tendrils. I will post the stages of the lily flower painting in my next post for those of you who wish to see the steps in painting this watercolor..


Thursday, May 24, 2012

Cymbidium_STep Three

 step Three, adding in the background flowers...

now I have to decide how much further to take the painting. Do I want a background? stems?
We will see....I might just wait on it for a while, as I have other things to paint.

Wednesday, May 23, 2012

Tuesday, May 22, 2012

Cymbidium-Step one


This is the beginning of a cymbidium orchid painting. Usually I work all over the paper at once.but in this case I wanted to establish the flower first, so I could see where they were going. I am going to add in one at a time, and will post as it progresses along. It is on a full sheet of watercolor paper, so the whole painting is pretty large.

Sunday, May 20, 2012

The Heart of the Rose


Many of my students have asked for the details on how to paint the rose and backgrounds, so I prepared the image above with the steps it took to paint The Heart of the Rose watercolor.
As you can see from the example, there are clear stages the watercolor painting goes through to layer up to the details. First the mask is applied around the edges, (I only do the edge..that way I can still work in the middle while the outside is drying. I hate to waste time, and I find that most mistakes are made when we are hasty.( i.e ..in a hurry for one thing to dry so we can proceed)  This way, I can work in both areas, and not be over anxious for the background to be totally done. I also find it helps to judge the subject next to the background, so you do not over do one or the other. I hope you enjoy this watercolor painting close up of a single rose.


Saturday, May 19, 2012

Rose so Sweet

click here to Bid on this painting.
As our early summer flower season begins, I started itching to paint some roses in watercolor. It was a toss between iris and a rose..and somehow late at night, when I usually get started painting something, I usually bite off the more complicated for some reason. But, after not have painted any roses for a long time, I was happy with the general way it came out. At least in Watercolor I can keep going and work my way around the flower, as while one petal dries, you can paint in a different part of the flower. As is usual to me, I pick up one brush, and usually use it for most of the painting. I am not sure why that is, as I certainly have plenty of brushes, and usually lay out several to use.. My students always comment on how I paint the whole painting (sometimes very large ones.) all with that darn one brush!
This one I used I really only picked up to start the background with for the first washes, but wound up using it for the entire painting. It was a fairly good sized brush -a number 10 round- and I would not have thought I could capture the details with it, but it happened to have a very  nice point, which was a surprise. I usually do not use a synthetic, that I call "carved" into shape but it was handy and my other brushes weren't.I mostly prefer nature sable brushes for anything that requites a point to paint with. But, this  Richeson Professional series 7000 really amazed me, and no  this is not an ad!  I will use it again and hopefully the fine point will maintain with additional use. Will let you know.

Wednesday, May 16, 2012

Rhododendron Plein Air


I love taking advantage of the spring flowers and the opportunity to paint on location- plein air- at this time of the year. Painting plein air in watercolor is quite a challenge, as you cannot take the time to wait while your painting drys in stages, or employ glazes like you do when working in the studio. Plein air painting requires you to capture the essence as quickly as possibly and not worry about the details so much. I think painting in plein air is essential to an artist being able to understand form and the way light interplays on the objects of your subject matter. Seeing this first hand enhances your ability to interpret light, when you are back in the studio working from reference shots. . Plein air paintings have a spontaneity and freshness about them that gets lost many times in studio work.

Tuesday, May 15, 2012

Apple Blossom -two ways


I posted this to show the Apple Blossom we were painting in my watercolor classes, one shows the flower cluster without a background, and the other with a background added after painting the flowers.
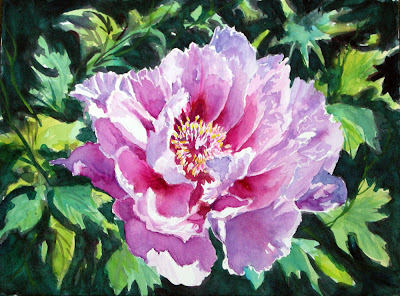
Here is the finished painting.
As I discussed in the previous posting, the luminous dark background was achieved by painting several layers of color by glazing one over the other allowing the previous color to shine through. Little bits of more intense color were dropped in to allow for a more interesting effect than just a flat background.